What does all this mean? You get to follow our journey to rid ourselves of junk. I have student loans and a business loan totaling a huge amount of debt. My husband has vehicle and recreational vehicle loans. We seriously need to rid ourselves of it, too. My plan? Sell a bunch of "junk" and start paying off that debt so we can relax a little more in life. If we learn tips and tricks, we'll share. If we learn what not to do, we'll share. If you have advice, please share!! Hopefully together we can minimalize our lives compared to what they are now.

Showing posts with label Organizing. Show all posts
Showing posts with label Organizing. Show all posts
Friday, January 3, 2014
Let It Go
My brother is a minimalist and will likely someday join the Tiny House Movement. While he was in town for Christmas he rubbed off on me a bit. No, I'm not going as extreme as him. We won't be selling our 4 bedroom/3 bath house in a quaint, family neighborhood for a 400 sq ft home. But when mom bought him some new Under Armour shoes for Christmas and he was excited that his one new pair of shoes would replace his running AND workout shoes, thereby allowing him to cut down from two pairs of sneakers to one, that really spoke to me. My family has entirely too much stuff. Yes, we do have two babies, and babies come with a lot of stuff. There's a high chair, bouncer, swing, bed for each, toys, educational supplies, etc., etc., etc. That stuff will stay. But I have a nice walk-in closet but still have to store about 5 or 6 large Rubbermaid boxes filled with off-season clothes. Our garage is so full of stuff we don't even park a car in it. And we currently have 2 storage units full of junk plus some stuff stored up at my parents' town.
Wednesday, August 21, 2013
Crafts (Organizing): Kitchen Storage Boxes
This is another project that I did using unfinished craft wood from Hobby Lobby, but if I did it again I would have my husband make the boxes. These were quick and easy creations, but they far beat the cardboard boxes that each of these items are packaged in at the store. I painted them to match my accent colors, added a little ribbon, and cut three layers of letters out of cardstock with my Cricut. Stacking three layers on top of each other gave them a more 3-D look.


Wednesday, August 14, 2013
Crafts: Repurposed Old Window ~ Turned ~ Necklace Holder
Thank you, Pinterest! I've seen several versions of this on Pinterest which inspired me to do my own. All of my jewelry has a nice home... except my necklaces. They have a drawer. Necklaces don't belong in a drawer. When you can actually find one to wear, it's so tangled with others that you end up going necklace-less.
My husband and I got permission to grab some old wood and stuff from a property that has an old house, barn, milk barn, and shed on it. They are all falling down. The house basically has no floor anymore, and it is dangerous to go in. We did, however, find some broken windows sitting on what is left of the floor. I grabbed them and took them home.
This is what the window looked like when I got it home:


Gross, right? It had nests all over it, chipped paint, one in tact window, one broken window, and one completely missing window, springs sticking out the sides, and filth galore. I strapped on the face mask and gloves, cleaned it up, scrubbed it down, sanded the loose paint, and took out the glass.

Then I painted it brown, nailed a bunch of nails an inch apart from each other, put a couple of picture hangers on the back, hung it on my wall, and draped my necklaces from it.

And there you have it! I spent absolutely no money on this necklace hanger! I used paint I had in my arsenal, nails I found in my old toolbox from about 5 or 6 years ago, and picture hangers I had in the same toolbox.
Wednesday, July 24, 2013
Organizing/Home Decor: Hanging Box Shelves
The next project for my husband was a set of shelves that I saw in a book and wanted. I love a contemporary look, but our house is rustic. So we thought these shelves would be a good mix. I failed to take pics of this project along the way like I did with the laundry room cabinets. Lesson learned. But at least you can see the final. I'm still working on getting them decorated.
He used 3/4 inch birch plywood for these shelves. One 4' x 8' sheet did the entire thing. He used 1/4 inch plywood for the backs of each box. He ironed edge banding onto all the edges to give them a more completed look. Then he stained them and applied polyurethane. I wish I had pictures of how he hung them, because he had to really engineer it up. Those suckers are heavy! They are hung in three separate sections.


He used 3/4 inch birch plywood for these shelves. One 4' x 8' sheet did the entire thing. He used 1/4 inch plywood for the backs of each box. He ironed edge banding onto all the edges to give them a more completed look. Then he stained them and applied polyurethane. I wish I had pictures of how he hung them, because he had to really engineer it up. Those suckers are heavy! They are hung in three separate sections.


Wednesday, July 17, 2013
Crafts/Organizing: Laundry Room Cabinets
One of the problems with our house is lack of storage. We are planning to put our house on the market in the spring, so we are trying to create some good storage areas to add to the appeal. Plus, I tend to be a little ocd. Messes stress me out. My husband got some new tools for Christmas, and he couldn't wait to use them. It took several days because the doctors are trying to teach him to pace himself better so he doesn't knock himself down for several days in a row. Otherwise this could probably be done in a day. But I couldn't be more proud of him for how they turned out.


Here was the "Before." I wanted to scream every time I walked in here.

He started with base:

Then he added bracing for support around the middle:

Awww.... Isn't my hubby handsome????

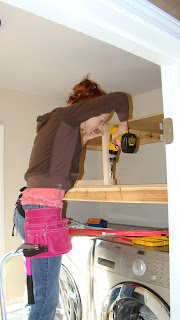
Here is me pretending to do something while wearing my new pink toolbelt that I LOVE!!!

After getting the middle braces, he added the shelves and the top support:

Next came the face frame:

Here it is from a straight-forward angle:

Next he painted the frame:

And finally he added the doors that he built and painted in the garage. (I didn't realize that bottom drawer to the dryer was open when I took this):

The final close-up:

Wednesday, July 10, 2013
Organizing: Coffee Container Boxes
A recent craft post showed the containers I made to store my coffee. Today I'm showing the boxes I made to house my coffee jars. I bought these boxes in the unfinished craft wood section at Hobby Lobby during a week they were on sale, but if I made them again I would just have my husband build them. I painted the inside and trim with the colors I use as my main accent colors in our great room. Then I decoupaged scrapbook paper onto the outside. I'm still working to perfect my decoupage technique as it is an artform, and I do not have enough experience with it. But I did the best I could. Then I took a sponge applicator and dabbed brown paint onto the edges in an attempt to make each side fade into it's edge. I hung them on the wall and placed my coffee jars in them. Bonus... the top one hides our thermostat.


From the side you hardly even notice the thermostat. It used to stick out on that wall like a sore thumb.

Notice on the decaf jars I flip-flopped the colors. That way we don't mistakingly grab the wrong one and end up staying awake all night. I recently got a new Cricut cartridge that has coffee on it, so I will add a coffee dye cut under the words "decaf coffee" to complete the look.


Here is a close-up of the sides and edges:

Wednesday, May 22, 2013
Crafts/Organizing: Coffee Containers
Hi, my name is Whitney, and I am a coffee addict.
Yes, it's true. My education is in exercise science and kinesiology, and I have an addiction to coffee. Not just coffee... coffee with cream and sugar. For the most part, we use organic coffee beans that we grind ourselves (although I do like Dunkin Donuts coffee from time to time). I sweeten my coffee with organic evaporated cane juice, and I cream it up with a bit of organic 2% milk from grass fed and finished cows. Better? This particular post is for my craft section of the site, though, so that's enough talk about the nutrition side.
I get tired of the ugly bags of coffee sitting around. If there's one thing I don't like in the kitchen, it's some of the ugly packaging that food comes in (or in the case of organic coffee, the brown bag you put it in when you buy it in bulk at Whole Foods, Fresh Market, or straight from a farmer). There's no point in throwing away (or taking to the recycle bin) jars you got from store bought items. You can always use them for something, and I ALWAYS do. I never, ever get rid of them! These coffee containers came from spaghetti jars. I used scrapbook paper, ribbon, and letter stickers to give my coffee some cute containers worthy of setting out for all to see. Bonus... it keeps your coffee fresh for much longer!


Subscribe to:
Posts (Atom)